


Main-Lining is another well-known technique to get bigger yields from marijuana plants. Main-Lining is an advanced technique that combines different pruning methods to get an efficient energy distribution along all plant, so higher yields. In this post we will detail how to apply Mainlining growing cannabis plants, indoors and outdoors, to get a better plant, and flowers, structure.
Contents
- 1 What does Main-Lining means?
- 2 Advantages of MainLining growing marijuana
- 3 Explaining Main-Lining technique step by step from seed:
- 4 Why topping and not FIM pruning?
- 4.1 Step 3: Delete everything grown under third node
- 4.2 Step 4: guide the new mains in a 90º angle
- 4.3 Step 5: Let your plants grow vigorously again and prune again the mains in a symetric way to double the number of mains
- 4.4 Step 6: Delete the shots grown under our new mains
- 4.5 Step 7: Repeat step 5 and 6 until getting the number of mains desired (proceed topping until getting 8, 16 or 32 mains)
- 4.6 Mainlining growing indoors:
- 4.7 Step 8: You are ready. Now you only have to wait main-lining to do the job for you
- 5 Mainlining autoflowering plants
- 6 Frequently Asked Questions about Main-Lining Technique
- 6.1 1. What is the Main-Lining technique in marijuana cultivation and what are its advantages?
- 6.2 2. When is the optimal time to start applying the Main-Lining technique and why?
- 6.3 3. Can the Main-Lining technique be applied to autoflowering plants?
- 6.4 4. When can apical pruning be done?
- 6.5 5. When is FIM pruning done?
- 6.6 6. Which is better, apical pruning or FIM?
- 6.7 7. How many times can FIM pruning be done?
What does Main-Lining means?
Main-Lining is an expression to define the concept of this technique. This technique takes its name of the will of using only the main shots of the plant. Mainlining creates a spot to equally distribute the plant's energy from roots to each cola. To apply this technique (named by a grower known as Nugbuckets), We will make a topping of the main cola, and then a low stress training step, and also a low branches pruning.
Advantages of MainLining growing marijuana
Applying main-lining to marijuana plants has many advantages like:
-Control plant's height.
-Equal energy distribution along all plant.
-Minimize the grams loss in low buds form.
-Equal canopy.
-Thicker buds.
-Stretch control.
-Once this technique is applied during vegetative stage there is no need to make more effords.
-Better adaptation to any place.
Explaining Main-Lining technique step by step from seed:
Step 1: Wait until seedlings have 5-6 nodes.
Following Nugbuckets' recomendations, the optimal moment to proceed with this step is when plants have developed their first 5-6 first nodes. It can be done later on, but all the extended time will be lost, due to plant would be spending energy in something that will be deleted. It is important to notice that plant should continue growing. Never do main-lining technique to a plant that has started to flower.
Step 2: Topping the plant until its third node (cut the main trunk over its real third pair of leaves)
Topping technique is base in doing a prune of the main top.
Why topping and not FIM pruning?
If we do a topping we can get rid of the main, or use it as a cutting, to create a new plant that will become an exact copy from the original mother.
After this step, your plant should only have 3 nodes.
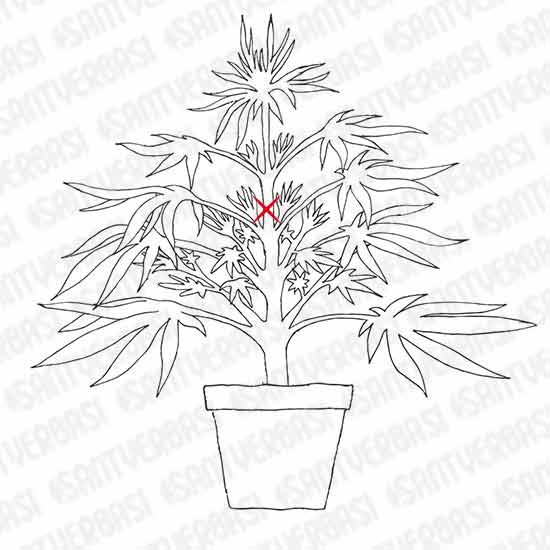
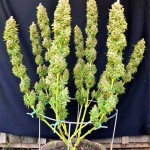
Untopped marijuana plant
Step 3: Delete everything grown under third node
Quit everything dveloped under the 3rd node, including cotyledons, shots and leaves.
The third node will be the new distribution center of the plant that will send all the energy and effords to develope this node.
So, the purpose of this step is to keep only the two new shots that are born in the third node, so the roots will only need to send energy to this point. This will allow your plant to distribute the energy to all parts of the plant.
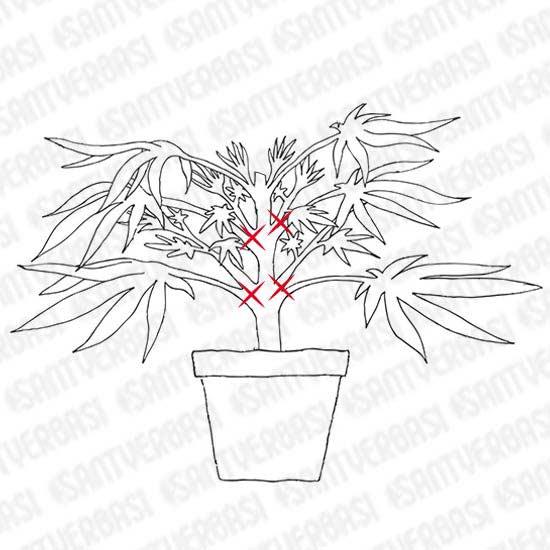
Quit everything grown under third node
*What does it happen if we cut too much?
If new shots kept in plant are still to small, it is possible that grower will like to keep the leaves just under them. Leaving those leaves for a certain time will save time, due to a faster developement of those shots.
Anyway, what is really important is to get rid of all shots existing under that third node.
Main-lined plant structure
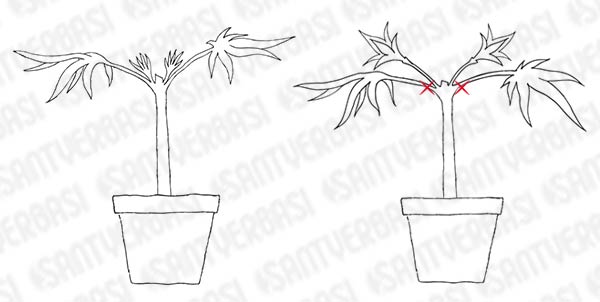
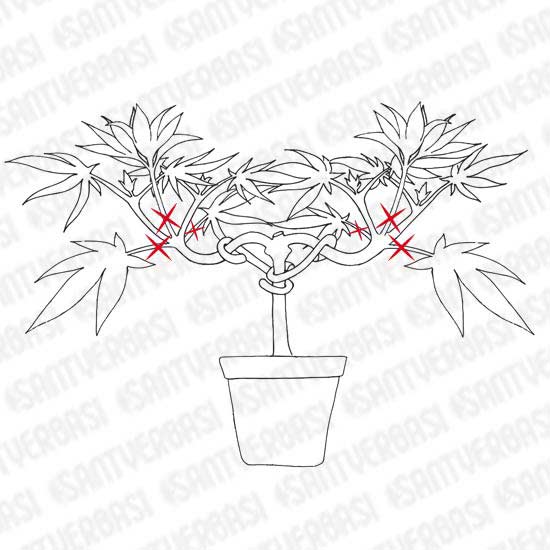
Step 4: guide the new mains in a 90º angle
At this point we should guide two new mains, creating a 90º angle.
If you wait until 5th or 6th node to start applying main-lining, probably you will be able to do this step by far. Whatever, if your two mains are too small to be tied, you'll only need to wait few more days of growing to do so. Once they've grown enough it is the moment to proceed with this step.
Every strain has its only growing time. Some plants need an extra growing, while others will have enough long shots to tie them before the last step. Some strains respond better to be guided and tied, while other don't, so you'll need to follow your intuition. If, for any reason, a new shot brakes, just tape it and plant will cure itself.
Know the plants we are working with helps a lot, but just in case we are scared of generate a movement too fast, you just need to give plants a couple of extra time between step and step to see how they react.
Slow movements taking care will prevent against breakage, at the same time they teach us what likes to our plants and what doesn't.
In cases where plants suffer from stress derived from temperatures, or defficiencies, is always better to wait until plants recover from that stress before follow with the technique.

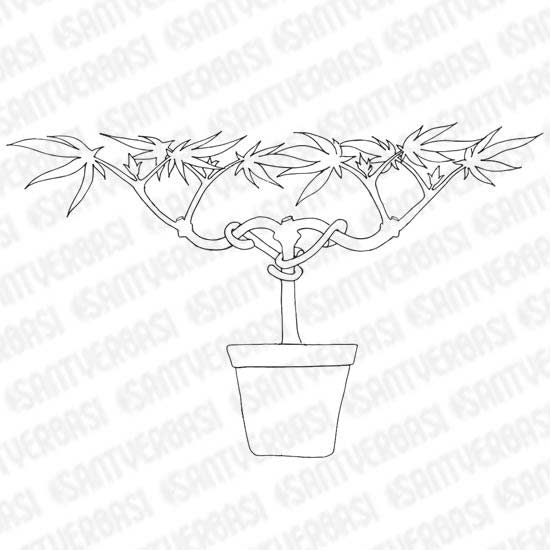
Guide for main-lining
To tie the new shots you can use whatever, but remember to don't use nothing as thing that could cut plant's skin. Gardening wire, hooks or whatever relatively rigid that allows to be shaped could be good. Never use fishing line (that could harm the stems).
Tie the main shots born on the node will keep your ending plant much more short, and will give your trunk main-lined appearance.
Step 5: Let your plants grow vigorously again and prune again the mains in a symetric way to double the number of mains
Wait until your plant restart growing quickly and healthy again.
You'll recognize when is the exact moment to proceed with this step when you'll see the main colas start stretching healthy.
Some growers wait until the new shots grow few nodes while others just wait the shots to be formed.
Mainlining step
Once plants show out again its developement, it is important to focus on which t¡its new main shots are. Choose properly its main lines it is important for the efficiency of plant's structure. You need to assure to choose properly the main nodes, and their correspondant sides for a better simetry.
Once chosen the nodes, we'll need to do a topping again of the top part of each main. For this step it is recommended to keep the leaves under the node for a while, because to do that will boost its developement.
Main-lined plant
Every time that we do a topping, we are doubling the number of mains of the plant, so once done this step we will have the double of mains than in step 4.
Step 6: Delete the shots grown under our new mains
Although Nugbuckets does this step just next to the last, some growers, specially less experienced in main-lining, could choose to wait some days to assure plant is responding well to the topping done, before cleaning appeared shots.
Grower can choose to keep the leaves just under the shots kept, or quit them, but Nugbuckets usually takes all of them out, except the ones directly under kept shots.
the most important thing is to quit all shots under your mains, because your intention is to tell your plant to send all its energy to your new mains. Any other shot would rob energy to the main structure.
Step 7: Repeat step 5 and 6 until getting the number of mains desired (proceed topping until getting 8, 16 or 32 mains)
As we explained previously, every time we do a topping, we are doubling the number of mains. Bascially because we are dividing the main cola in two each time we top.
This way you can prune the plant once to get 2 mains, twice to get 4, three times to get 8, etc.
Recomendation of number of toppings depending on type of growing
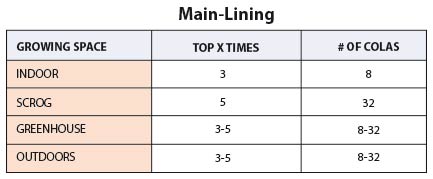
Mainlining growing indoors:
Generally, growing indoors, it is recommended to get 8 mains (that you'll get doing 3 toppings, included the first one).
Main-Lining outdoors and in greenhouses: Prune 3-4 times to get between 8 and 16 mains per plant. This way we'll improve sunlight absortion and we'll get bushy plants.
We specially recommend the use of sativa strains with Scrog technique, thanks to its better side branching. It is better to give them a few extra time of growing (to better fill the net) before switching to flowering.
*Important: More main colas doesn't mean better. In most cases, the optimal number of mains is 8 or 16. Unless you are growing in Scrog, more mains doesn't usually improve yields, and also you'll expend more time in vegetative stage.
Step 8: You are ready. Now you only have to wait main-lining to do the job for you
Unlike many other growing techniques, main-lining is a front-loading process. Once step 7 is done, there is not much to do, but keeping your plant alive and healthy.
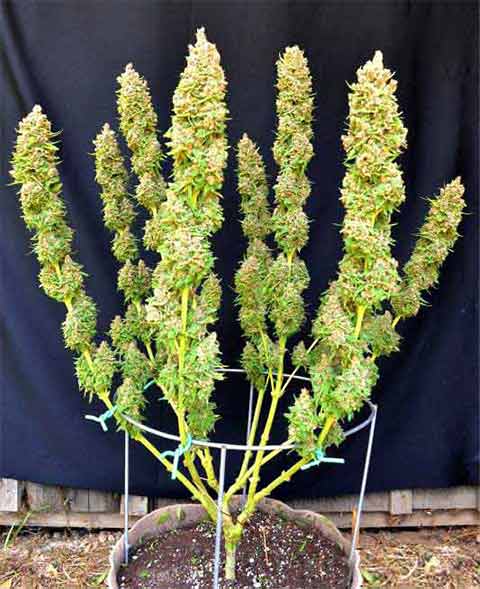
Foto from: Nugbuckets
Mainlining autoflowering plants
We left autoflowering plants for the last part as these kind of plants should be treated different to photodependant ones.
Mainlining as a technique is great for almost all plants and strains but autoflowering plants. These automatic strains don't like prunings, nor nothing that could cause them stress. If autoflowering strains suffer stress they turn into dwarfs, they don't yield as much, and they suffer many other problems that turn into a yield decrease.
If you are growing autoflowering plants we encourage you to don't use mailining technique. trust us, we've tried almost everything and it won't work.
Did you liked this post? Help us continue our job writing and give us a like
If you enjoyed this article, mayybe you also find these ones interesting:
Frequently Asked Questions about Main-Lining Technique
1. What is the Main-Lining technique in marijuana cultivation and what are its advantages?
The Main-Lining technique is an advanced cultivation method that combines various pruning techniques to achieve a more efficient distribution of the marijuana plant's energy, resulting in control of plant height, equitable redistribution of energy, minimization of lower bud loss, and thicker buds, among other benefits.
2. When is the optimal time to start applying the Main-Lining technique and why?
According to Nugbuckets, the optimal time to start with Main-Lining is when the marijuana plant has developed between 5 and 6 nodes. This timing is key because it allows the plant to remain in a vegetative state and avoids wasting energy on parts of the plant that will be discarded.
3. Can the Main-Lining technique be applied to autoflowering plants?
No, the Main-Lining technique is not recommended for autoflowering plants. Autoflowering plants do not respond well to pruning due to their short life cycle and can easily become stressed, which would negatively affect their development and production.
4. When can apical pruning be done?
Apical pruning can be performed when the marijuana plant has developed between 5 and 6 nodes, although it can be done later. This procedure involves cutting the stem above the third pair of leaves, seeking to stimulate the plant to develop more lateral branches and evenly distribute its energy.
5. When is FIM pruning done?
Although the article does not specifically mention the timing for FIM pruning (Fuck I Missed, a technique that involves cutting less than 75% of the tip of the plant), it is generally done in the same interval as apical pruning, between the 5 and 6 nodes. The main difference between the two techniques is that FIM is less invasive than apical.
6. Which is better, apical pruning or FIM?
The choice between apical pruning or FIM depends on the grower's goals. Apical pruning promotes greater control over the plant's structure and usually generates a more defined number of main tails. On the other hand, FIM pruning is less invasive and can produce a larger number of shoots, albeit with less uniformity. The decision should be based on personal management preferences and specific production goals.
7. How many times can FIM pruning be done?
Although the article does not specify the number of times FIM pruning can be performed, in general, this technique can be applied several times during the plant's vegetative phase. However, it is important to allow time for the plant to recover between prunings and avoid excessive stress. The number of times it is performed will depend on the structure desired by the grower and the plant's ability to recover and continue growing vigorously.


We try to do our best writing. If I can ask you for a favour, just tell your friends about us. That would be much appreciated.
Best wishes,
SantYerbasi team
Thanks for everything man. Good things!
Thans for read our blog
Regards
Nugs
Those temperature differences could be a problem, but I guess it comes from a light too high above plants, so plants are stretching trying to find the light intensity they need. Said this, there are some strains more likely to be main-lined than others, and your could be one of those that respond better to other techniques than to this one, but I don't think this is the case.
Best
Ive read nugbucket tutorial over and over and you can see in one of his setup, the one with a DWP system with the gray moving boxes as "pots", that he top after the third node again.
While in the pictures where he s using the beige cloth pots, he topped them right after the first node. ?
Im confused because all my plant grow symetrical nodes right away at the first node after the 1st topping.
Logic would say to go with the first node since topping again after the 3rd one would take more time to get the "same" results ?!?
Am i right? If the plants is growing healthy after the first step of main-lining i should top it again after the first node and leave the fan leaves, right ?
Thanks for clearing that up, im sure its gonna help another fella or 2 thats wondering too ??
Your guessings are right, I would go for the first node too. You can wait for the third again and again but it only will take longer to get the process done.
Best
One more question, is there any kind of "potty" i can use to fill in the gigantic hole on my more mature plant cause i waited a lil too long b4 first topping on that one.
It grew way faster than her sisters so the main thrunk isnt as shut as the others i can see pretty deep in there ... im not sure if it may cause the plant to be too dry or harm it somehow. Should i leave it like that ? ?
Thanks again for sharing your knowledge ✌?
If the trunk it's not a from a plant that it's been vegged for years I would consider to fill that scar. It's not a big deal for plants. If a plant, or tree it's more woody then you should, but with these kind of plants it's not necessary.
best
and B: if you want a more compact plant that barely goes outside pot edges(early) or are using, say 4 plants in a square tent and need to fill 1/4 or tent each(late top)
You should follow all steps before turning plants to flower. Once you change the photoperiod (or you notice first flower spots outdoors) just let the plants do their thing without removing any part. Once plants adapt to new photoperiod you can remove new shots from the bottom of the plant to help her focus all energy to tops, but apart from that don't cut anything.
Best
Yes, not only suitable, it works even better with sativas due its structure.
Best
I would do it that way, but it depends on the genetics and plant's structure so if you want you can try leaving some of them and trimming some off. Then you'll get more info about how does it affect to that certain strain.
Best
thanks for this detailed guide. One of the best I seen so far in the web. I've already mainlined a several times with good results. But one question I have I was never able to find an answer on it or be able to answer myself. So maybe you can hare your thoughts with me.
At the point where you top the 3rd time I try to flat it all out to come as much as possible to the outer edge of the bucket with my mains. Than fix it to the tomato ring. But when do you switch in flower? Immediately when it reaches the ring and can be fixed to it? Some strains the nodes are far away from each other. With my strains (24k Gold, Bannana kush, OG Kush) I have mainlined yet they are much shorter in distance to each other. Do you wait until maybe site shoots came out and prune them away before switching to flower or does it matter generally how long you let them grow out after 3th topping for 8 colas before switch to flower? While let them grow out cut it right away or wait until you are ready to switch and delete all under your main then?
OGMojo420
As you noticed not all the strains react to this technique the same way so you have to know how your strain will stretch before you flip them to flower. If you work with mostly sativa strains you can turn them to flower the same day you tie them (or after a short period of time like 4-5 days). If you work with indica-type is better to wait a couple more days before flipping them to flower.
At the end what's important is your plants get a certain size before starting to flower. Keep this in mind and you'll never suffer from short plants.
About the second question, I usually remove what's under when I mainline excep the last time you mainline because I will do it 4-5 days after plants start to flower (this way I really know what shoots will be usefull and what not.
Best
For mother plants the most appropriate is to always prune the tops, every 7 to 14 days (depends on the size of clones you wish). Doing this way you will cdouble every time the amount of clones you can take and also do a canopy managment.
Regards